
[ad_1]
1 of the big troubles with kitchen area sinks is the h2o that builds up all over it. H2o prospects to cleaning soap scum and mould all around the sinks’ rim on major and on the base.
Cleaning your kitchen sink’s rim is not an insurmountable dilemma. But continual cleaning receives outdated immediately, specifically when you have so substantially else to clean up in a kitchen area.
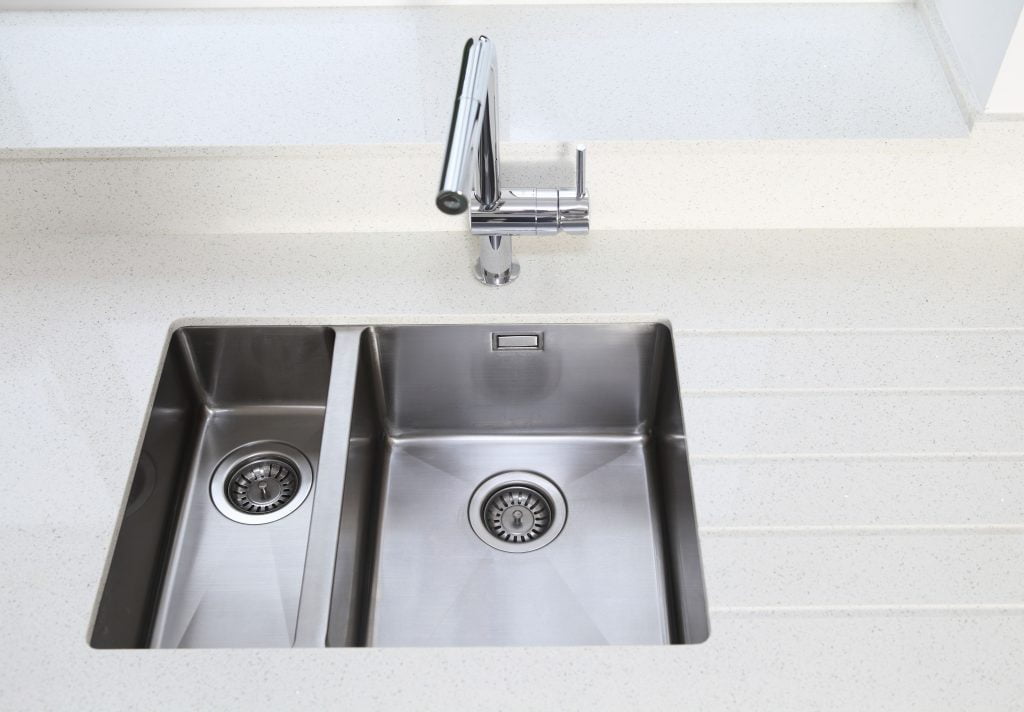
Other than a reasonably handful of built-in kitchen area sinks where the countertop and sink are all a single molded unit, most kitchen area sinks are units separate from the countertop. They fall into one particular of two types: drop-in sinks or undermount sinks. One particular crystal clear gain of undermount sinks is that they assistance you stay away from the water build-up problem.
Fall-In Sinks vs. Undermount Sinks
Drop-in and undermount sinks the two have their advantages and shortcomings. Drop-in sinks are effortless to install since they simply fall, or sit, into the countertop cutout and are supported by a rim resting on the countertop itself. But simply because the rim is lifted up over the encompassing countertop, h2o can spill out on to the countertop.
Undermount sinks have no challenges with drinking water spillage on to the countertop considering that they hang down down below the major of the countertop. Undermount sinks are substantially more challenging to install since their heavier body weight is suspended from the bottom of the countertop with clips and adhesives.
This makes an undermount kitchen sink specially prone to leaking all-around the recessed edge of the sink—the seam the place the best lip of the sink meets the underside of the countertop. Except the sink has been installed completely, you may possibly properly obtain that drinking water leaks close to this seam, spilling h2o onto the floor inside the sink base cupboard.
Fall-in sinks (also named self-rimming) fall in from the leading and dangle by means of the rim of the sink. In sharp distinction, undermount sinks are these that are secured beneath the cutout opening in the countertop, fundamentally hanging from the base of the countertop.
Re-Sealing an Undermount Sink
Whether or not you set up the undermount sink on your own or had it mounted by a pro, it can be not unheard of for leaks to establish in a subject of days or weeks immediately after the installation. When this takes place, the trouble very likely has a single 3 causes.
Poorly Prepared Countertop Base
The base of the countertop (the place it contacts the sink) may not have been cleaned completely. Denatured liquor ought to be employed to clean up off all surfaces prior to caulking. Dust on granite or stable-area this sort of Corian or Silestone can typically compromise the caulking and really should be cleaned up just before installation.
Insecure Clamps
In other conditions, the base was thoroughly cleaned but the set up was not safe plenty of. The clamps or the epoxy, or both equally, utilised to safe the sink to the base of the countertop were being loose plenty of to bring about the caulk to speedily pull absent.
Completely wrong Sealant Was Used
The sink installer may perhaps have failed to use a genuine kitchen sealant. Most undermount sink producers suggest that you use pure, 100-% silicone sealant for undermount sink installation. Silicone sealants are created for resilient flexibility and have fantastic adhesive houses. If an everyday caulk was employed to seal the sink, it probably will fall short promptly.
How to Fix Undermount Sink Leaks
Though the process is cumbersome, you can likely remedy leaks on an undermount sink by oneself.
- Start out by crawling less than the sink and checking to make absolutely sure the clamps are securely keeping the sink to the base of the countertop.
- From inside the cabinet, apply new 100-percent silicone sealant to the seam close to the sink.
- If you make sure the sink is tightly clamped, then you can try out to recaulk and assess if it has eradicated any leaking.
The greatest answer is to totally eliminate the sink and re-seal the sink to the countertop.
- Shut off the drinking water.
- Remove all of the plumbing source and drain pipes.
- Unclamp the undermount sink from the countertop.
- If the silicone caulk is aged enough and has been failing, it must be relatively uncomplicated to pull the sink away from the countertop.
- With the sink eradicated, scrape absent as considerably caulk as you can from the prime flange of the sink.
- Clean the surfaces completely with denatured alcohol.
- With the joint clean up and dry, use a skinny bead of the encouraged silicone sealant to the best flange of the sink.
- Re-install the sink immediately, just before the silicone sealant cures.
- Clamp into put.
- With a clean rag, wipe absent any sealant that could have seeped by means of both facet of the sink.
[ad_2]
Residing IN Style
M-Style is a enterprise with 10 many years of practical experience in furniture market, our personnel are obtainable to execute any person task, in accordance to the client’s demands, so that you truly feel snug in the household you have dreamed of.